Open Source Unity Client for Remote Configurations
Joystick may be the best way to manage and use JSON remote configs with your Unity projects. The Joystick Unity package (open source) provides an easy-to-use interface to fetch remote config content from the Joystick platform and utilize it in your Unity game. Make changes to your game parameters instantly and easily without code updates or going through App Store approvals.
| Full JSON Configs | Multi-Environment | Environment Sync | Config Manager |
|---|---|---|---|
 |
 |
 |
 |
Visit Github Repo: github.com/getjoystick/joystick-unity
Installation
Requires Unity 2019.2+
To use the Joystick Unity package, you will need to have Unity installed on your computer. Once you have Unity installed, install the Joystick Unity package through the Unity Package Manager. To use the Joystick package, you will need to have Unity installed on your computer. Once you have Unity installed, you can install the Joystick package through the Unity Package Manager.
Open your Unity project. 1. Open the Package Manager window by selecting Window > Package Manager from the Unity Editor menu. 1. Click on the "+" button in the top left corner of the Package Manager window. 1. Select "Add package from git URL". 1. Enter the following URL into the text field: https://github.com/getjoystick/joystick-unity.git 1. Press the "Add" button to add the package to your project. 1. Once the package is installed, you will be able to start using it in your project.
Install via UPM (using Git URL)
- Navigate to your project's Packages folder and open the manifest.json file.
- Add this line below the
"dependencies": {line - UPM should now install Joystick-Unity and it's dependencies.
Don't want to use git? Just download and unzip the repository into the Packages folder.
Install via OpenUPM
The package is available on the openupm registry. It's recommended to install it via openupm-cli.
Getting Started
To use the Joystick Unity package, you need to follow the below steps:
- Open the Joystick Editor window by going to "Joystick" -> "Setup Window" in the Unity Editor.
- Open the "Environments" tab, you can define the environments and select current enviroment type. For each environment, you can specify a name and API Key. The Envariment Type will be used to provide environment-specific configurations.
- After importing the package, you can access the Joystick class by using the following namespace: JoystickRemote.
- The Joystick class contains the following static methods:
-
FetchConfigContent(RequestContentDefinition definition, Action
-
FetchConfigContent(string[] contentIds, Action
-
FetchCatalogContent(Action
-
SetRuntimeEnvironmentAPIKey(string apiKey)
- To fetch content, call the FetchConfigContent method, passing in the RequestContentDefinition or a string array of contentIds and the callback method. You can also set a boolean value to force updating the content when requesting.
- To fetch the catalog content, call the FetchCatalogContent method, passing in the callback method. You can also set a boolean value to force updating the content when requesting.
Example Usage:
Fetching Config Content using RequestContentDefinition
using JoystickRemoteConfig;
using UnityEngine;


public class FetchContent : MonoBehaviour
{
    public RequestContentDefinition requestContentDefinition;
    private void Start()
    {
        Joystick.FetchConfigContent(requestContentDefinition, OnContentFetchComplete);
    }

    private void OnContentFetchComplete(bool success, string response)
    {
        if (success)
        {
            Debug.Log("Content Fetch Successful: " + response);
        }
        else
        {
            Debug.LogError("Content Fetch Failed: " + response);
        }
    }
}
using JoystickRemoteConfig;
using UnityEngine;

public class FetchContent : MonoBehaviour
{
    public string[] contentIds;
    private void Start()
    {
        Joystick.FetchConfigContent(contentIds, OnContentFetchComplete);
    }

    private void OnContentFetchComplete(bool success, string response)
    {
        if (success)
        {
            Debug.Log("Content Fetch Successful: " + response);
        }
        else
        {
            Debug.LogError("Content Fetch Failed: " + response);
        }
    }
}
Fetching Catalog Content
using JoystickRemoteConfig;
using UnityEngine;

public class FetchContent : MonoBehaviour
{
    private void Start()
    {
        Joystick.FetchCatalogContent(OnCatalogFetchComplete);
    }

    private void OnCatalogFetchComplete(bool success, string response)
    {
        if (success)
        {
            Debug.Log("Catalog Fetch Successful: " + response);
        }
        else
        {
            Debug.LogError("Catalog Fetch Failed: " + response);
        }
    }
}
Set Runtime Environment API Key
using JoystickRemoteConfig;
using UnityEngine;

public class SetRuntimeEnvironmentAPIKey : MonoBehaviour
{
    private void Start()
    {
        Joystick.SetRuntimeEnvironmentAPIKey("{You API Key}");
    }
}
Set GloalExtendedRequestData in runtime
using JoystickRemoteConfig;
using UnityEngine;

public class SetGloalExtendedRequestDataInRuntime : MonoBehaviour
{
    private void Start()
    {
        Joystick.GlobalExtendedRequestData.SetUniqueUserId("{You Unique UserId}");
        Joystick.GlobalExtendedRequestData.SetVersion("{Your Version}");
        Joystick.GlobalExtendedRequestData.SetAttributes(new AttributesData[]
        {
            new()
            {
                key = "{Your Key}",
                value = "{Your Value}"
            },
            new()
            {
                key = "{Your Key}",
                value = "{Your Value}"
            }
        });
    }
}
Use Examples
Here is an example of how to deserialize JSON data that includes hyphens.
using System.Collections.Generic;
using JoystickRemoteConfig;
using Newtonsoft.Json;
using UnityEngine;

public class ConfigsData
{
    [JsonProperty("my-config-01")]
    public ConfigItem config01;

    [JsonProperty("my-config-02")]
    public ConfigItem config02;
}

public class ConfigItem
{
    [JsonProperty("data")]
    public YourData configData;
    public Dictionary<string, object> meta;
}

[System.Serializable]
public class YourData
{
    [JsonProperty("some-numeric-data")]
    public int someNumericData;

    [JsonProperty("some-more-data")]
    public int someMoreData;
}

public class JoystickExample01 : MonoBehaviour
{
    private void Start()
    {
        string[] contentIds = { "my-config-01", "my-config-02" };

        Joystick.FetchConfigContent(contentIds, (isSucceed, result) =>
        {
            if (isSucceed)
            {
                var deserializeConfigData = JsonConvert.DeserializeObject<ConfigsData>(result);

                var config01SomeNumericData = deserializeConfigData.config01.configData.someNumericData;
                var config02SomeMoreData = deserializeConfigData.config02.configData.someMoreData;

                Debug.Log("config01SomeNumericData: " + config01SomeNumericData);
                Debug.Log("config02SomeMoreData: " + config02SomeMoreData);
            }
        });
    }
}

public class JoystickExample02 : MonoBehaviour
{
    [SerializeField] private RequestContentDefinition _contentDefinition;

    private void Start()
    {
        Joystick.FetchConfigContent(_contentDefinition, (isSucceed, result) =>
        {
            if (isSucceed)
            {
                var deserializeConfigData = JsonConvert.DeserializeObject<ConfigsData>(result);

                var config01SomeNumericData = deserializeConfigData.config01.configData.someNumericData;
                var config02SomeMoreData = deserializeConfigData.config02.configData.someMoreData;

                Debug.Log("config01SomeNumericData: " + config01SomeNumericData);
                Debug.Log("config02SomeMoreData: " + config02SomeMoreData);
            }
        });
    }
}
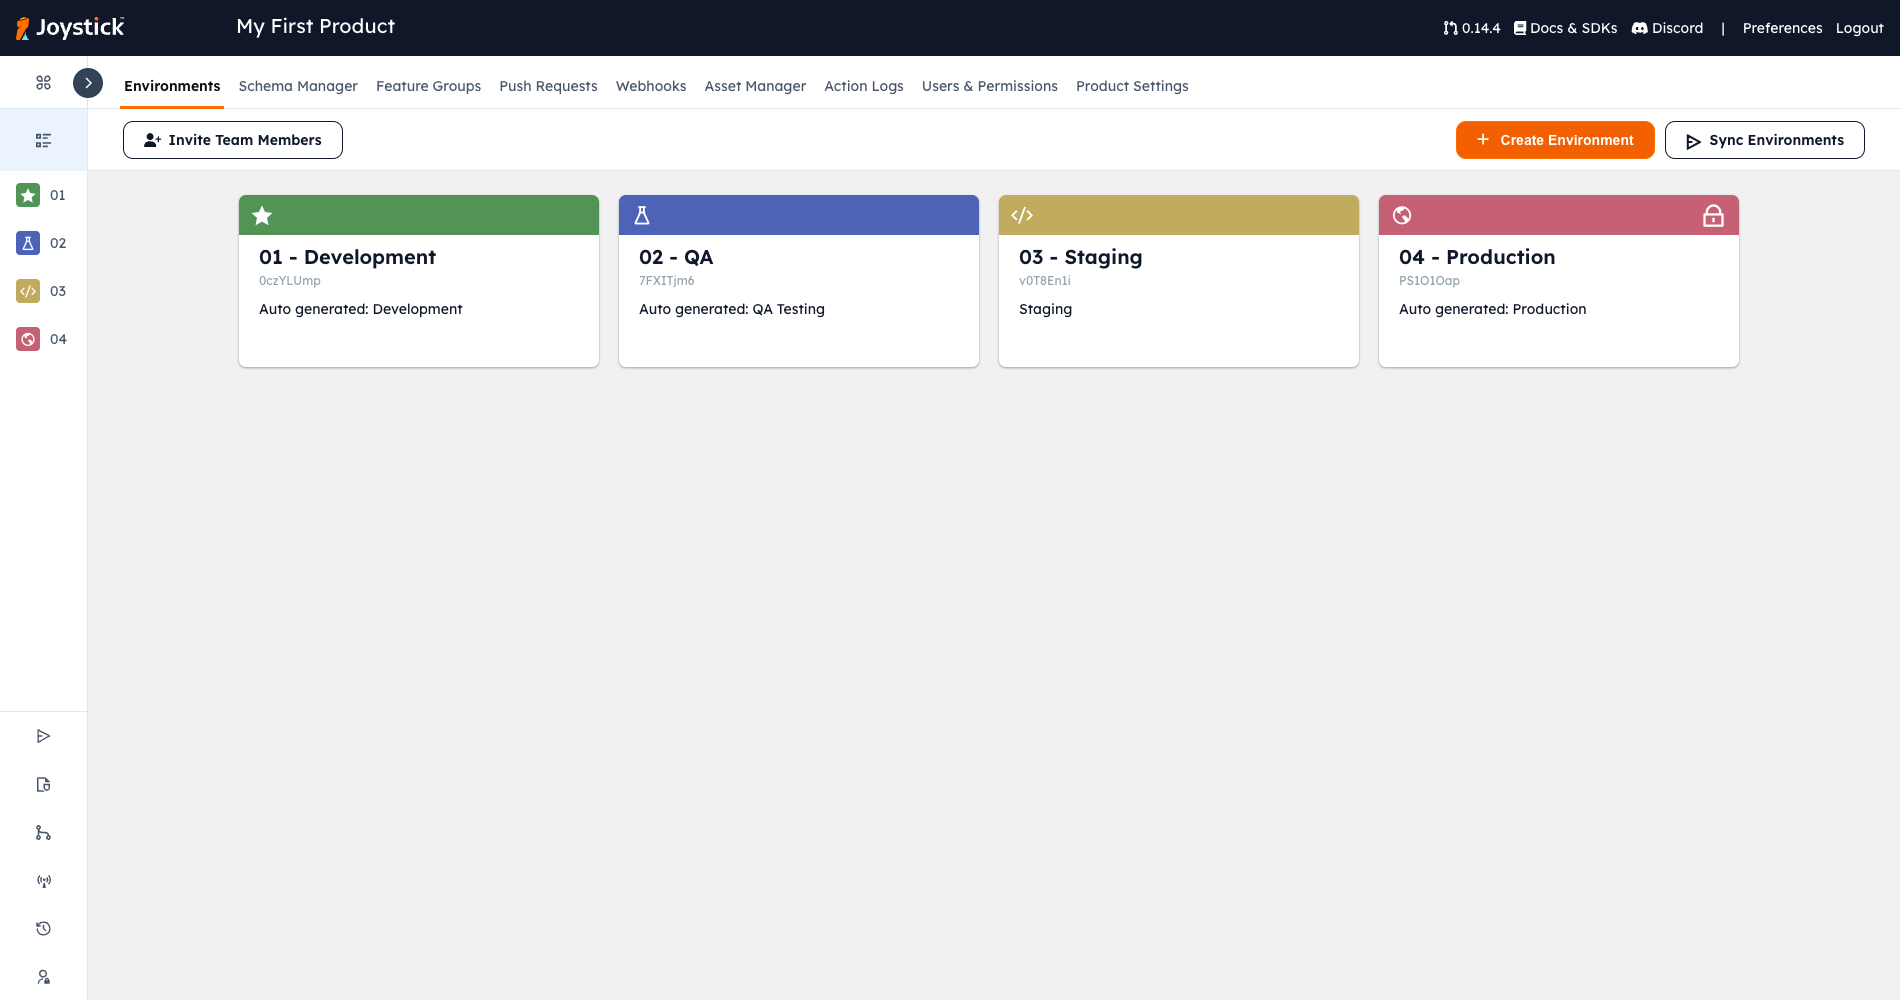
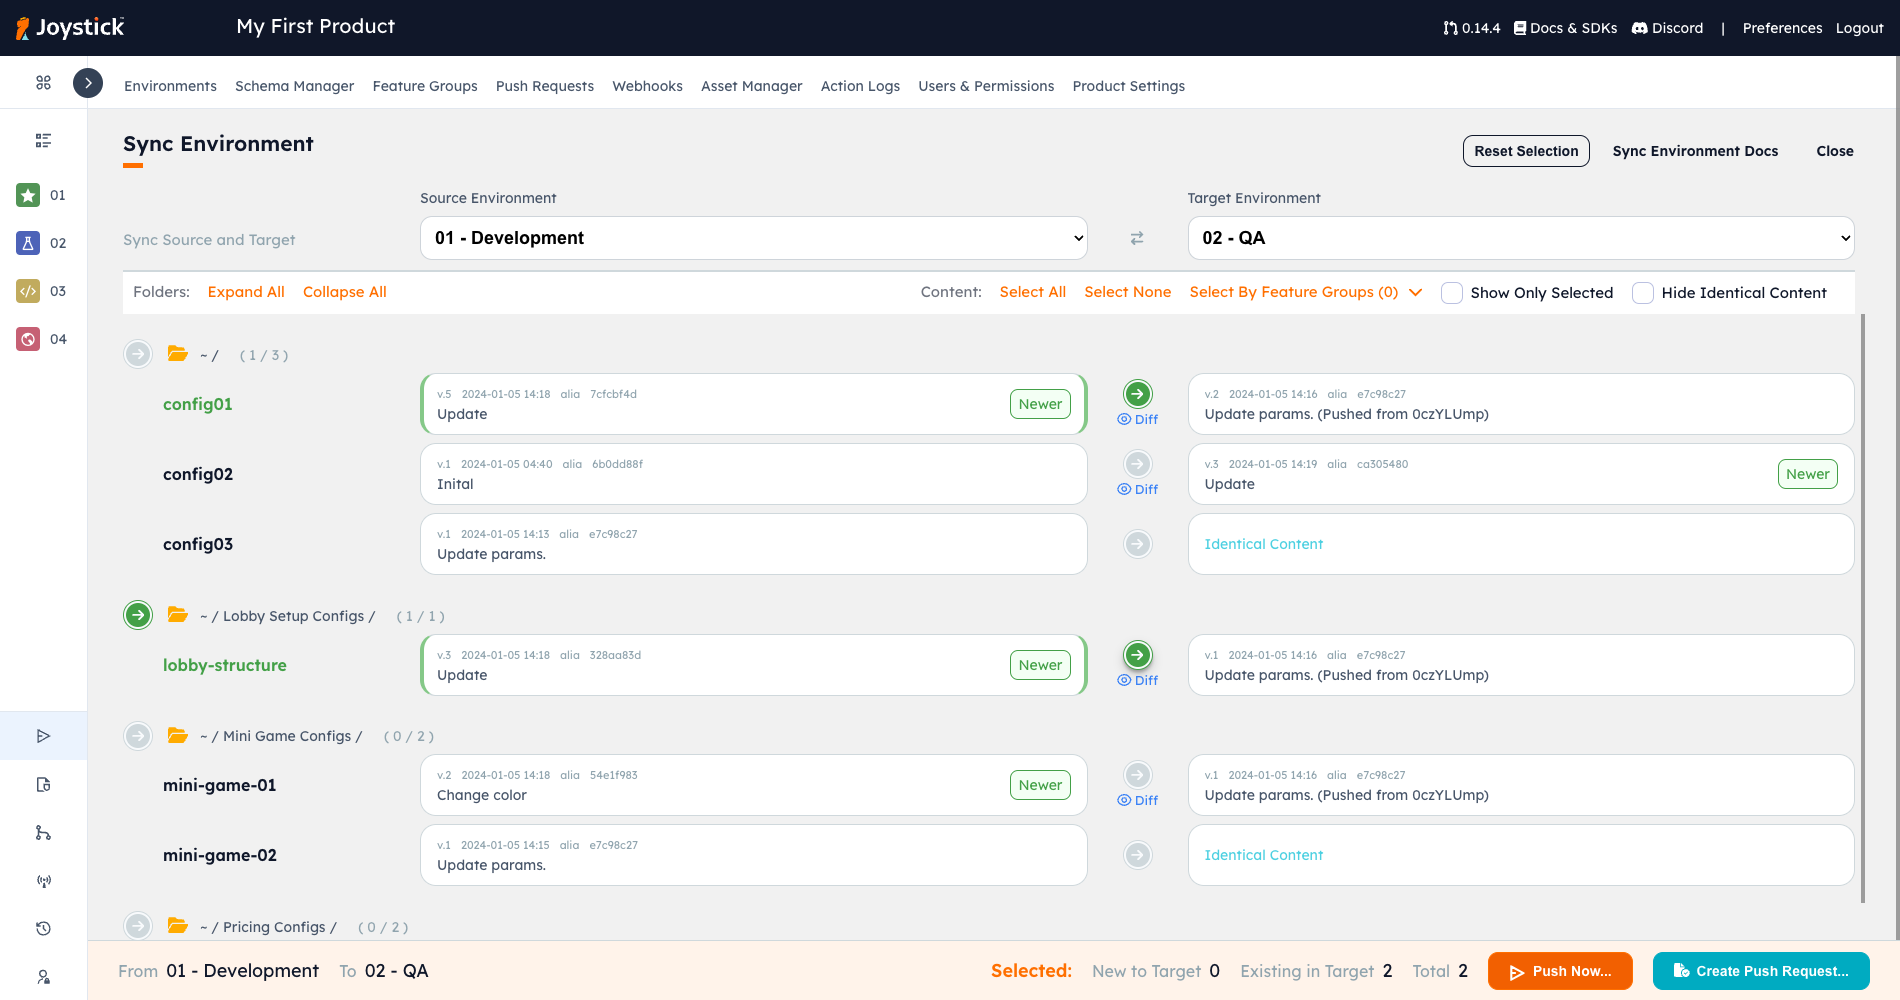
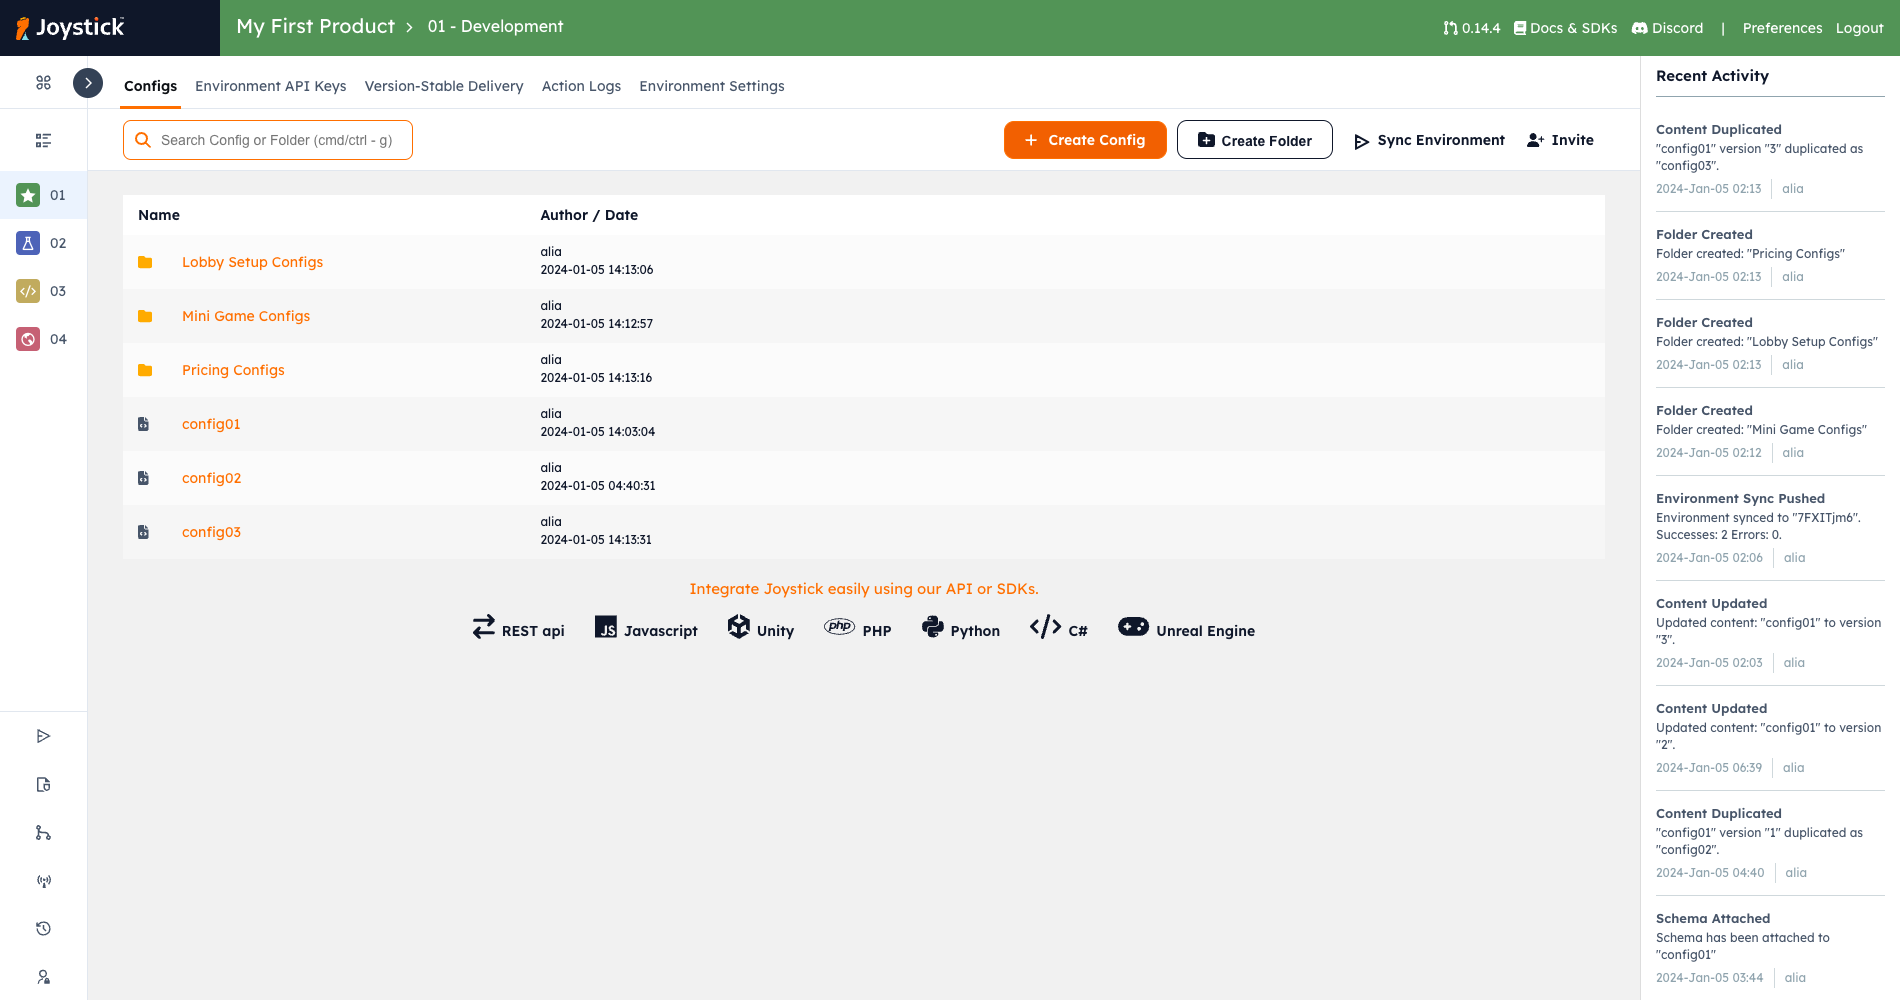
The following demonstrates how the remote configuration data is arranged on the Joystick dashboard.


Note: To use the Joystick Unity package, you need to have a Joystick account and have configured the remote content on the Joystick server. Also, make sure to check the "Request Data at Start" option in the Joystick editor window to trigger the OnAutoStartFetchContentCompleted event when the data fetching is complete.
Caching Mechanism
Caching config data is a technique used to improve the performance of an application by reducing the number of requests made to a server to retrieve data that doesn't change frequently. By caching the data, subsequent requests for the same data can be served directly from the cache, which can significantly reduce the load on the server and improve the responsiveness of the application.
C#
FetchConfigContent(RequestContentDefinition definition, Action<bool, string> callback, bool getFreshContent = false)
C#
FetchConfigContent(List<ContentDefinitionData> configList, Action<bool, string> callback, ExtendedRequestData extendedRequestData = null, bool getFreshContent = false)
All three FetchConfigContent methods are used to retrieve configuration data from a server. By default, the methods will attempt to retrieve the data from a cache if it exists, but you can set the getFreshContent parameter to true to force the methods to fetch the data from the server.
Joystick Setup Window
The Joystick Setup Window can be accessed in Unity by selecting "Joystick" from the top bar menu, followed by "Setup Window". Within the Joystick Setup Window, there are three tabs: "General", "Environments", and "Request Config".
General
Under the "General" tab, you can find "Serialized Response" and "Enable Debug Mode" options. The former adds "responseType=serialized" to your request URL and returns serialized JSON data in your response data when toggled on. The latter enables Joystick's built-in logs, providing detailed information during the development process. Additionally, the "Information" window contains buttons to visit the official website and development documentation, as well as a button to check for package updates.

Environments
In the "Environments" tab, you can create environments for your project. Each environment has a name and an API key that can be obtained from your Joystick dashboard. After entering the required information, click "Update Environments Button" to sync the environments in your project. You can then select which environment to use in your project using the drop-down list.


Request Settings
GlobalExtendedRequestData

Request Data At Application Start
The "Request Config" tab includes the "Request Data at Start" option. When toggled on, your project will automatically fetch data at the start using the referenced Request Content Definition.


The Request Content Definition is used to call Joystick's MultipleConfigs API, which includes multiple content IDs. The contentIds is an array that contains multiple string items. Extended data can be added to the request, including "Unique User ID", "Version", and an array of "Attributes". The "Attributes" array contains key-value pairs of data to be sent to the Joystick server.

